All posts in LomoKino

Family X-Mas trip to South America

I come to this post with a feeling of celebration and relief. Celebrating a great portrayal of an amazing family x-mas adventure, and relief from scanning lomokino frames. I’ve certainly already put in a few years worth of scanning time over the past week, processing 8000+ frames individually. There really was no better workflow, and I’ve researched every possible avenue on this one. There are some programs designed to ease the Lomokino process, but they are so new and very faulty. To grab the full quality and effect of this camera, it was necessary to properly scan each frame. Hopefully someone develops an easier method in the future!

Every year our family meets at Christmas for a vacation. We’re all spread over the country so it’s the best way to keep the gang close, if you will. And of course, that’s what Christmas is all about. This year we found an incredible cruise leaving from Rio de Janeiro, travelling down the coast of South America to Buenos Aires. It was such a change of scenery and shockingly a destination we all never expected to visit in our lives. It’s just so far down there…

This would be the first time I’ve spent a Canadian winter in a summer location, as it is in Australia, South America and quite possibly somewhere else in this small world of ours. We obviously expected sunshiny beach weather, but we weren’t aware Brazil was the hottest place on earth at the time! Quickly we were all congratulating each other on spectacular instant tans, spending slightly more time in the mirrors speaking to ourselves about our new sexy faces. Soon after we were covering our bodies with towels and screaming as the sun literally ripped through our skin, properly toasting each and every one of us. At one point, I felt I could peel my whole face off, similar to a mask in Mission Impossible (the new film is amazing btw…).

Cruising is such great way to spend a relaxing vacation, cause you can really slack off and do diddly squat. The service is ridiculous from your rooms to the restaurants. Sometimes I would think to myself, “I could really use a diet coke”, and POOF, it had already arrived. The staff even lifted my body into the shower and went through the shampoo and conditioning process for me.

We saw amazing scenery and ventured into incredible atmospheres ranging from remote waterfalls to heavily over-populated metro areas. I was once again the crazy guy with a camera taking shots of absolutely everything, but this time I was holding a little black box with a crank on the side… it was so much fun! Ever since the first roll of film expired, I’ve been dying to get the edit done. I’m all smiles now as my newly digitized collection of 63 film rolls has come to rest in it’s new video form. I think you’ll love the way it looks, and hopefully understand why I went through so much to get it done. Aside from the fact it’s my ultimate passion to make films, there’s just no way you can’t be intrigued, at the very least, when watching the final product. In a world where everyone is blasting around with super ultra high-end resolution monster cameras, it’s sometimes nice to take it back a few years and engage in your creative realm with an original, organic medium.

You’ll see about half-way through the film, we were taken to a little island called Isla de Lobos (sea-lion island). Isla de Lobos is a nature reserve because it has the largest colony of sea lions in the western hemisphere. Many tourists venture out as far as we did, but apparently we were one of the only groups EVER to ask if we could swim with the sea lions! Since we didn’t take the tour with an official touring company, our captain gave a small shrug of the head when asked if we could swim around Isla de Lobos… the protected nature reserve. We took the small shrug as an “absolutely!”.

Never in my life have I experienced something close in comparison. I was blown away by the thousands of beautiful sea lions surrounding us (literally) and the shear terror of what may be going on beneath us. “Think of how good the shots will be!” I said as I threw my body into unfamiliar wild sea creature territory… not words I’d like as my last. I need to extend a huge thank you to Johnny McCann for being the brave one who jumped in first, as there’s not a chance in hell I would’ve otherwise. He was sort of an experiment. For about 5 minutes we all stood on the boat watching him swim into the pack (heard, flock, group?) of blubbery cute water monsters, expecting for something to pull him under. His short-term survival was enough to convince my brother Chase, sister Kiesa and I to follow suit. Thanks Johnny!

It may be awkward to watch a strange family run around the beaches of Uruguay, but please enjoy the film I’ve put together below:

Here is the black & white version of the film:

Workflow: I shot mainly with ASA 400 & 800 Lomography film, but found myself purchasing the standard Kodak gold 400 as I quickly ran out. The Lomokino has an average shutter speed of 1/100th, and an f-stop range of 5.6 to 11. At a full controlled crank you can average about 4-6 fps, though I tend to lean towards a slower crank to try and make each frame noticeably different.

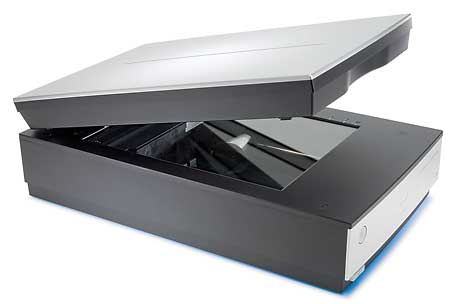
At the end of the trip, I gather all 63 rolls and had the negatives developed at the local one hour photo - it took two days. The next step was to bring home the rolls, and make measured cuts so that I could fit separate slides into the holders on the V700 Epson scanner. I tried using Silverfast (said to be the ultimate scanning software) but for this operation it was garbage, so I relied on the standard Epson Scan software which worked a treat. It takes approx 45 minutes to properly scan a roll of Lomokino film. My girlfriend Laura suffered through many long days of “REEEE RO REEEEEE” sounds which I know must of driven her mad, but thankfully she was a good sport. I do want to reenforce the fact that if you take on a big project with the Lomokino, you will be scanning your ass of for a long time. Make sure you understand this before going in headfirst as I did. It’s one thing to process a 30 second clip, as you’ve probably come accustomed to seeing online, but I ended up with 25 minutes of footage!!!

The editing was done in FCS 3, which will officially be my last edit using the software. I’m in a strict undertaking of all the Adobe programs, and love the new direction they’re heading in.

Best wishes in 2012!

B.


The V700 Epson “Miracle”!

I came across a shocking discovery last night which proved my Lomokino could be even more impressive, more so than I even knew to be possible. It all started with my recent return from South America and the need to scan 63 rolls of Lomokino footage. Pretty ridiculous amount of film, but I really enjoy this process and love the aesthetic of the finished product, even more lately. Previously, my go-to scan wonder was the Epson V330 Perfection, which I bought as the bottom-of-the-barrel scanner that would perfectly suite the cheaply made (material wise) lomokino and it’s generally low quality image. And I’ve been using it with total satisfaction, aside from dreadfully slow scan speeds, and really enjoyed the work I was creating. Now as I’ve just returned from a large trip with 63 rolls of film, I’m facing 7 days of straight scanning with the V330, so I decided to upgrade to essentially the top-of-the-line flatbed scanner, the Epson V700 Perfection. Quite a contrast in appearance and cost, and even more to my surprise, optical scanning ability.

This image is from my first batch with the V330, a result I thought to be normal from the Lomokino:

After using the V700 on the same batch, I was shocked to see this:

It’s pretty spectacular how much of a difference we’re seeing in the two images, both scanned off of identical film slides. It’s impossible for me to ever justify using a cheap scanner now as I’ve been blown away by the knew found knowledge of how great the lomokino shots can really look! If you’re knew to the Lomokino/Film Scan game, it’s important to do your research and ensure you have the whole production process on lock - check out the production notes from Lomography.


Plutino Group

Shot this fun little clip again with Jennifer Collins after a great shoot at Plutino Group. We had a whole array of outfits to fool around with BUT the Lomokino unfortunately broke near the beginning of our fun, so this is an edit with what little we were lucky to come away with! FYI - Lomography exchanged my broken Lomokino for a brand new one on the spot within a minute of me walking in the door crying for help…. very pleased with the customer service!

Vintage J.C. - LomoKino


As I write to you at this very moment, I’m simultaneously scanning the remaining frame cuts from a nice random fun shoot I did with model Jennifer Collins. It’s taken me an hour or so to get all the frames digitalized and I’m excited to see the end coming so quickly! It’s actually EXTREMELY time-consuming, the workflow of the LomoKino… but every step is unique and equally exciting! There’s something really special about the analog process (though there’s heavy digital steps involved, like DIGITIZING the film with your EPSON PERFECTION V330 Film SCANNER WOOOO!) that helps create the LomoKino experience as something to be fond of. I feel like I’m capturing moments in an organic natural way, sucking life into individual frames where it waits patiently until I give my next command. Looking at the picture above, I think back to my memories of the day and wonder if it’s nicer to wipe them clean and rely solely on the “Lomo Frames”, a term I coined moments ago. Notice how scratched and grainy the image is, how red and happy everything looks infront of the 100% cotton background I purchased for $70 at some fabric store (impressive, I know). It’s also no obstacle filming someone like Jennifer, who comes to life the instant the camera spots her… not to say off-camera she’s a zombie. She does make it easy!

I’m glad we found the energy to have a little fun after a long days work. You read my posting of the initial LomoKino test with my brother, Chase… it turned out well but the workflow was exhausting and my experience with the LomoKino was zilch! This go around I really wanted to expand on what I had learnt through trial and error, to really see what kind of organic dream like feel I’d be able to create with this thing. Looking at the images, I’m pretty happy with what I’m achieving, even after all the minor investments I’ve made to aid the workflow and possibility with LomoKino. LomoKino - $79 DigitalIZA -$40 Epson film scanner - $130, so not cheap to rally get yourself rolling, but with this combination you can really make something that few can produce… it’s a special set-up. And what’s $250 compared to the going rate for a t3i, 7D, mk ii or 1D X!!!???

Let’s have a look at this video clip that I’m very VERY happy to show you! It’s just a quick high energy moment of pure nothing… nothing meaning JOY! The combination of JC, LomoKino and Foster the People has definitely hit a sweet spot for me, and I even added blue text! I’m the proud father of a dreamy dance, one I didn’t create, participate in nor even think about learning… it was Jen at her improvisational peak AND pit. It’s just fun, and I love it! I love this little camera! Check out the video below…

LomoKino Super 35mm Movie Maker *UPDATE*

A couple days ago I purchased a little black box. The lady at the store said it’ll take standard 35mm film and give me 30 to 60 seconds of recording time, depending on how fast I crank the wheel! By this time, I had already seen some examples of what this little baby can do, and the output is very desirable to say the least. It captures moments in somewhat of a dreamlike essence, making ordinary everyday moments seem like a warm fuzzy memory. I’ve been a long time user of the Digital Harinezumi, which IMO has been the leader for reproducing super 8 styled footage in a cheap, digital format. The D.H. is limited to a very small 640×480 frame size, but otherwise produces a very enjoyable filmic look… but is nowhere as exciting, to me, as the creamy dream-like visuals produced by the LomoKino Super 35mm Movie Maker!!


Lomography LomoKino Teaser No.2 from Lomography on Vimeo.

Since my purchase of the little black box a couple days ago, I’ve been through 9 rolls of film. From filming my brother’s awkward dance routine to disturbing my beautiful girlfriend during her breakfast, I simply could not resist filming… whatever I could! The big and only let down I find in this camera body, is simply how fast you go through a roll! You’ll just be heating up in the moment and suddenly your OUT, and the red flag pops open right in your face, almost in a mocking fashion… HAHAHA YOU’RE DONE BUDDY! Reloading the camera isn’t too difficult, but it is time-consuming and rather bothersome. I’ve been dreaming about applying the look to some wedding films at Elle & Be, and I WILL, but the moments will be very few and selective. There’s no pulling out your run & gun style event coverage with this 30 second climax camera! The best you can hope for is a few beautiful sequences, barring decent exposure, that will add an organic feel to your films…. whether it be weddings, events, or whatever!

I’ll develop my 9 rolls this week and figure out the whole workflow, updating this post with a video from myself and also a breakdown of how you get from film to facebook.

*UPDATE*

I managed to piece together a small clip out of the little salvageable footage I found myself with… Out of the 9 rolls I brought in, 3 were properly exposed, and barely! LomoKino is a very smart little design, and is going to end up being the tool I use to create hundreds of silly little clips, but this first trial has definitely been a pain in the ass! It all started with the One Hour Photo guy telling me the fastest return on film would be 3 days…. total bullshit. Then I returned to pick up my film, which I had asked to be scanned onto a disc. What I didn’t know (and should’ve researched first!!) is that you’ll need a special device called the digitaLIZA from Lomography. In the Digitaliza you place your negatives and then insert the Digitaliza into your scanner…… import your frames to iMovie, etc, etc… I had them scanned to a DVD! I had 36 frames per roll and inside each frame, I found 4 video frames that each had to be separated MANUALLY! Crop, save as new image, undo crop, re-crop… OMG! I only had the patience to got through this tedious routine with one roll, which I had chosen as the clear exposure/excitement winner. This ridiculous clip you’re about to see is my first sample of the LomoKino possibilities, and please don’t expect to be blown away as it’s my brother dancing in the bedroom!! Take a look: